

the ultimate grilling guide
complete with video tutorials!
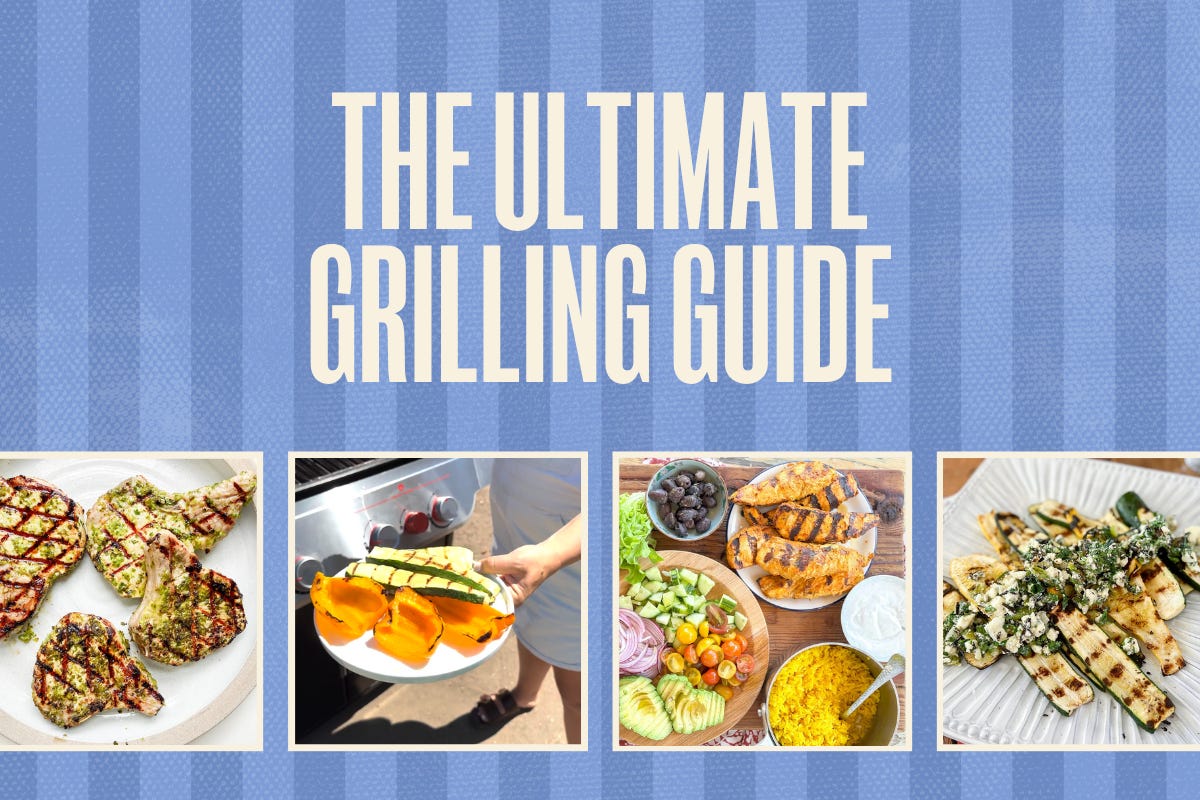
Here’s everything you need to know about grilling in one place, because frantically googling “how long do I grill chicken?” while your food is already on the fire is not the chill grilling vibe we're going for this summer.
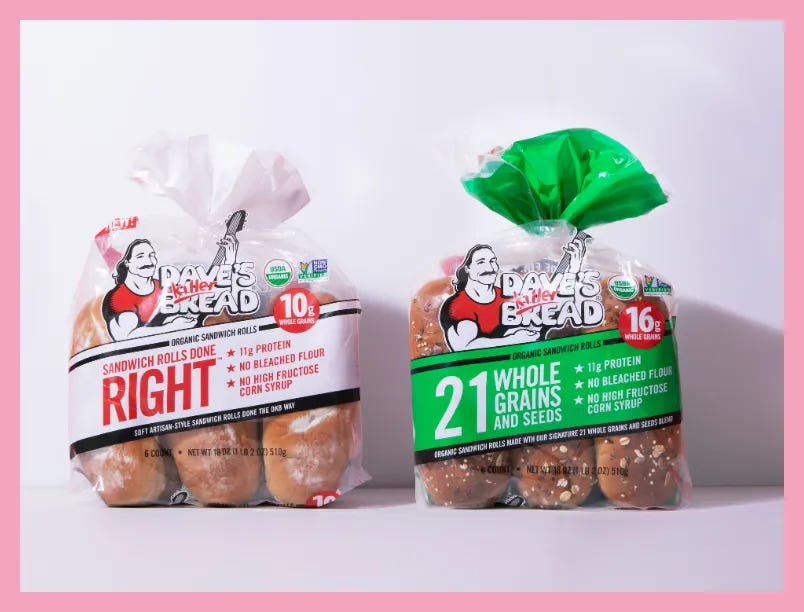
Today’s email is sponsored by Dave’s Killer Bread! The boys and I have loved Dave’s sliced sandwich bread, bagels, and burger buns for years, and are newly obsessed with their Sandwich Rolls, which are perfect for hotdogs or turning any grilled protein into a gourmet sandwich. Across the board their breads are full of whole grains and protein (they’re also organic, dairy-free, and non-GMO), and their burger buns (6 to 8 grams of protein!) and Sandwich Rolls (11 g of protein!) — are no exception. They’re soft while also sturdy, and are just all around delicious. You all know I love sandwiches for dinner — Dave's plays a big role in that. Thank you to Dave’s for supporting the production of this grill guide!

Spend less than 10 minutes watching these videos and you’ll leave feeling empowered with the grilling basics!
Heads up: I’m a gas/propane grill girl. It’s what I always grill on and, IMO, is much more busy weeknight friendly than a charcoal grill, so I am demoing on a gas grill today. For everyone looking for a charcoal grill how-to (it really is a whole different beast!), watch this. And for Blackstone tips, click here. But then come right back to this guide, because I’ve got a bunch of tips below that are relevant no matter the type of grill you’re using — like meat cook times, safe internal temperatures, easy marinades, gourmet grilled sandwich combos, a burger index, side ideas, and more.
Chapter 1 // The Essential Grilling Tools
In my opinion, these are the only grilling tools you actually need:
Silicone tongs: I freaking hate those gigantic, unwieldy, stainless steel grill tongs. They are so unnecessary. I just use long silicone tongs, which can fit in a normal drawer easily and can also be used indoors in your nonstick skillets.
Wire grill brush: I use this for the initial cleaning of the grill grates. Wire bristle brushes work the best for cleaning, but there have been horror stories about them leaving wires behind and thus in food, so…
Coil grill brush: … I now use a coil grill brush as a second step after using my wire grill brush, which will dislodge any bristles that might have stuck to the grill.
Instant-read meat thermometer: I’ve said it once and I’ll say it again: You do not have x-ray vision! You cannot cook perfectly cooked meat without a meat thermometer.
Constant-read meat thermometer: I use this one more often for big cuts of roast meat like a beef tenderloin, but I’ll also use it on the grill for a really thick-cut nice steak like a tomahawk.
Spatula: I like to use a regular-sized stainless steel fish spatula — it lets you really get those stuck-on bits up when you flip, but, again, isn’t unnecessarily long and unwieldy.
Grill basket: If you’re grilling a lot of small vegetables (or shrimp!), a grill basket is a really nice thing to own. Think: grilled Brussels sprouts, baby potatoes, store-bought fajita-cut vegetables… the sky’s the limit!
Grill: I use and am demoing on a Weber Genesis. I’ve also had and loved Weber Spirits.
Chapter 2 // How To Connect the Propane Tank and Light the Grill
How to safely attach the tank: Before connecting the propane tank to your grill, ensure both the grill valves and propane tank valve are in the OFF position. Remove the plastic cap from the propane tank valve, then align the regulator (the black twisty piece) with the tank valve threads and turn it clockwise by hand until it’s hand-tight — never use tools to tighten it more as that can damage the brass fittings and create a dangerous leak.
Listen for leaks: Once connected, slowly open the tank valve (turn it counterclockwise) and listen for any hissing sounds (hissing sound = potential leak).
To be extra-safe: If you are feeling nervous or suspect a leak, you can apply a mixture of dish soap and water to the valve connection point — if bubbles form when you open the tank valve and turn the grill on, you have a leak and need to turn off the gas immediately, disconnect the propane tank, then reconnect it more securely (to do so, you can read your grill’s instruction manual, Google how to fix it, and/or have it serviced by a professional). PS, this rarely happens but I want you to have the info should you ever need it.
Lighting sequence:
Open lid — always, always open the lid before lighting!
Turn the first burner to high
Press the ignite button
Note: As you’ll see in the video, my grill has a safety feature that requires me to push the ignite button as I turn on each burner — that is not always the case. For a smaller grill, once the first burner is lit, you can turn the other burners on without hitting the button again.
Preheat the grill: Light all your burners, set a timer for 10 minutes, go inside and finish prepping your food to grill. Then come back to clean and oil the grates…
Chapter 3 // Cleaning and Oiling the Grill Grates
Clean grates = nonstick grates! Food sticks to dirty grill grates. Cleaning the grates is important, and easy!
Always preheat your grill BEFORE trying to clean it: Turn on all of the burners and blast all of that grease and food residue with heat for at least 10 minutes. This will basically turn it to char/ash and allow you to easily scrape it away.
Scrub the grates clean: Use a wire brush first, then a coil grill brush in case any wire bristles came off.
Once your grates are clean, oil them: Do this by soaking a paper or dish towel with olive oil or any neutral oil such as avocado or vegetable, then using tongs to run the soaked towel all over the grates. You don’t want them to be dripping with oil (this can lead to flare ups) — just lightly coated.
Deep clean your grill at least once a year: If your grill is constantly having flare ups that don’t quickly die down, this is a sign that there’s tons of grease build up in the base of your grill.
If your grill is in really rough shape and needs parts replaced, this is a detailed video walking you through how to do that. You could also Google deep clean or repair instructions for your specific grill — most brands will have videos and/or detailed guides for this.
Chapter 4 // Two-Zone Setup + Cooking Demo
Grill lid opened or closed?
Unless the recipe you’re cooking says otherwise, cook with your grill lid closed.
When you open the lid (to clean the grates, add food, flip the food, check your meat’s temperature, etc.) your grill will lose heat. Don’t stress! It’ll come back up quickly once you close the lid back down.
Two-zone cooking: This is when you set up two different heat zones on your grill:
A direct heat/hot/high-heat zone = a zone on your grill where the burner beneath the grill grate is lit and on high.
An indirect heat/low- or no-heat zone = a zone on your grill where the burner beneath is off or set to low (or medium).
When to use hot/direct heat:
The direct heat — or hot zone — is for searing, AKA getting those beautiful grill marks. If I’m cooking something thin and fast-cooking like chicken breasts or thighs, veggies, shrimp, or thin pork chops, I will just set up one direct-heat/sear zone because just searing it will cook it all the way through.
When to use indirect or low heat:
“Grilling over indirect heat” means cooking food on a burner with no heat directly beneath it (while burners or coals are lit on the other side of the grill). You’ll see an example of this in the video, when I move the zucchini to the “cool zone” of the grill.
Sometimes a recipe may call for you to turn the cool zone burners on low or medium heat rather than off completely.
Use a combo of both: For thick cuts of meat, you can start off by searing it on the hot side, then moving it to finish cooking through on the cool side. Why? because if you just cook over high heat the entire time, your meat or veg might burn on the outside before cooking through on the inside.
Always let your meat rest after grilling: Always let your meat rest for at least 5 minutes for a small cut, or 10 to 15 minutes for a larger cut. This isn’t just so that it cools down, this will ensure the juices settle in and don’t just flow out when you cut it, which will leave you with dry meat!

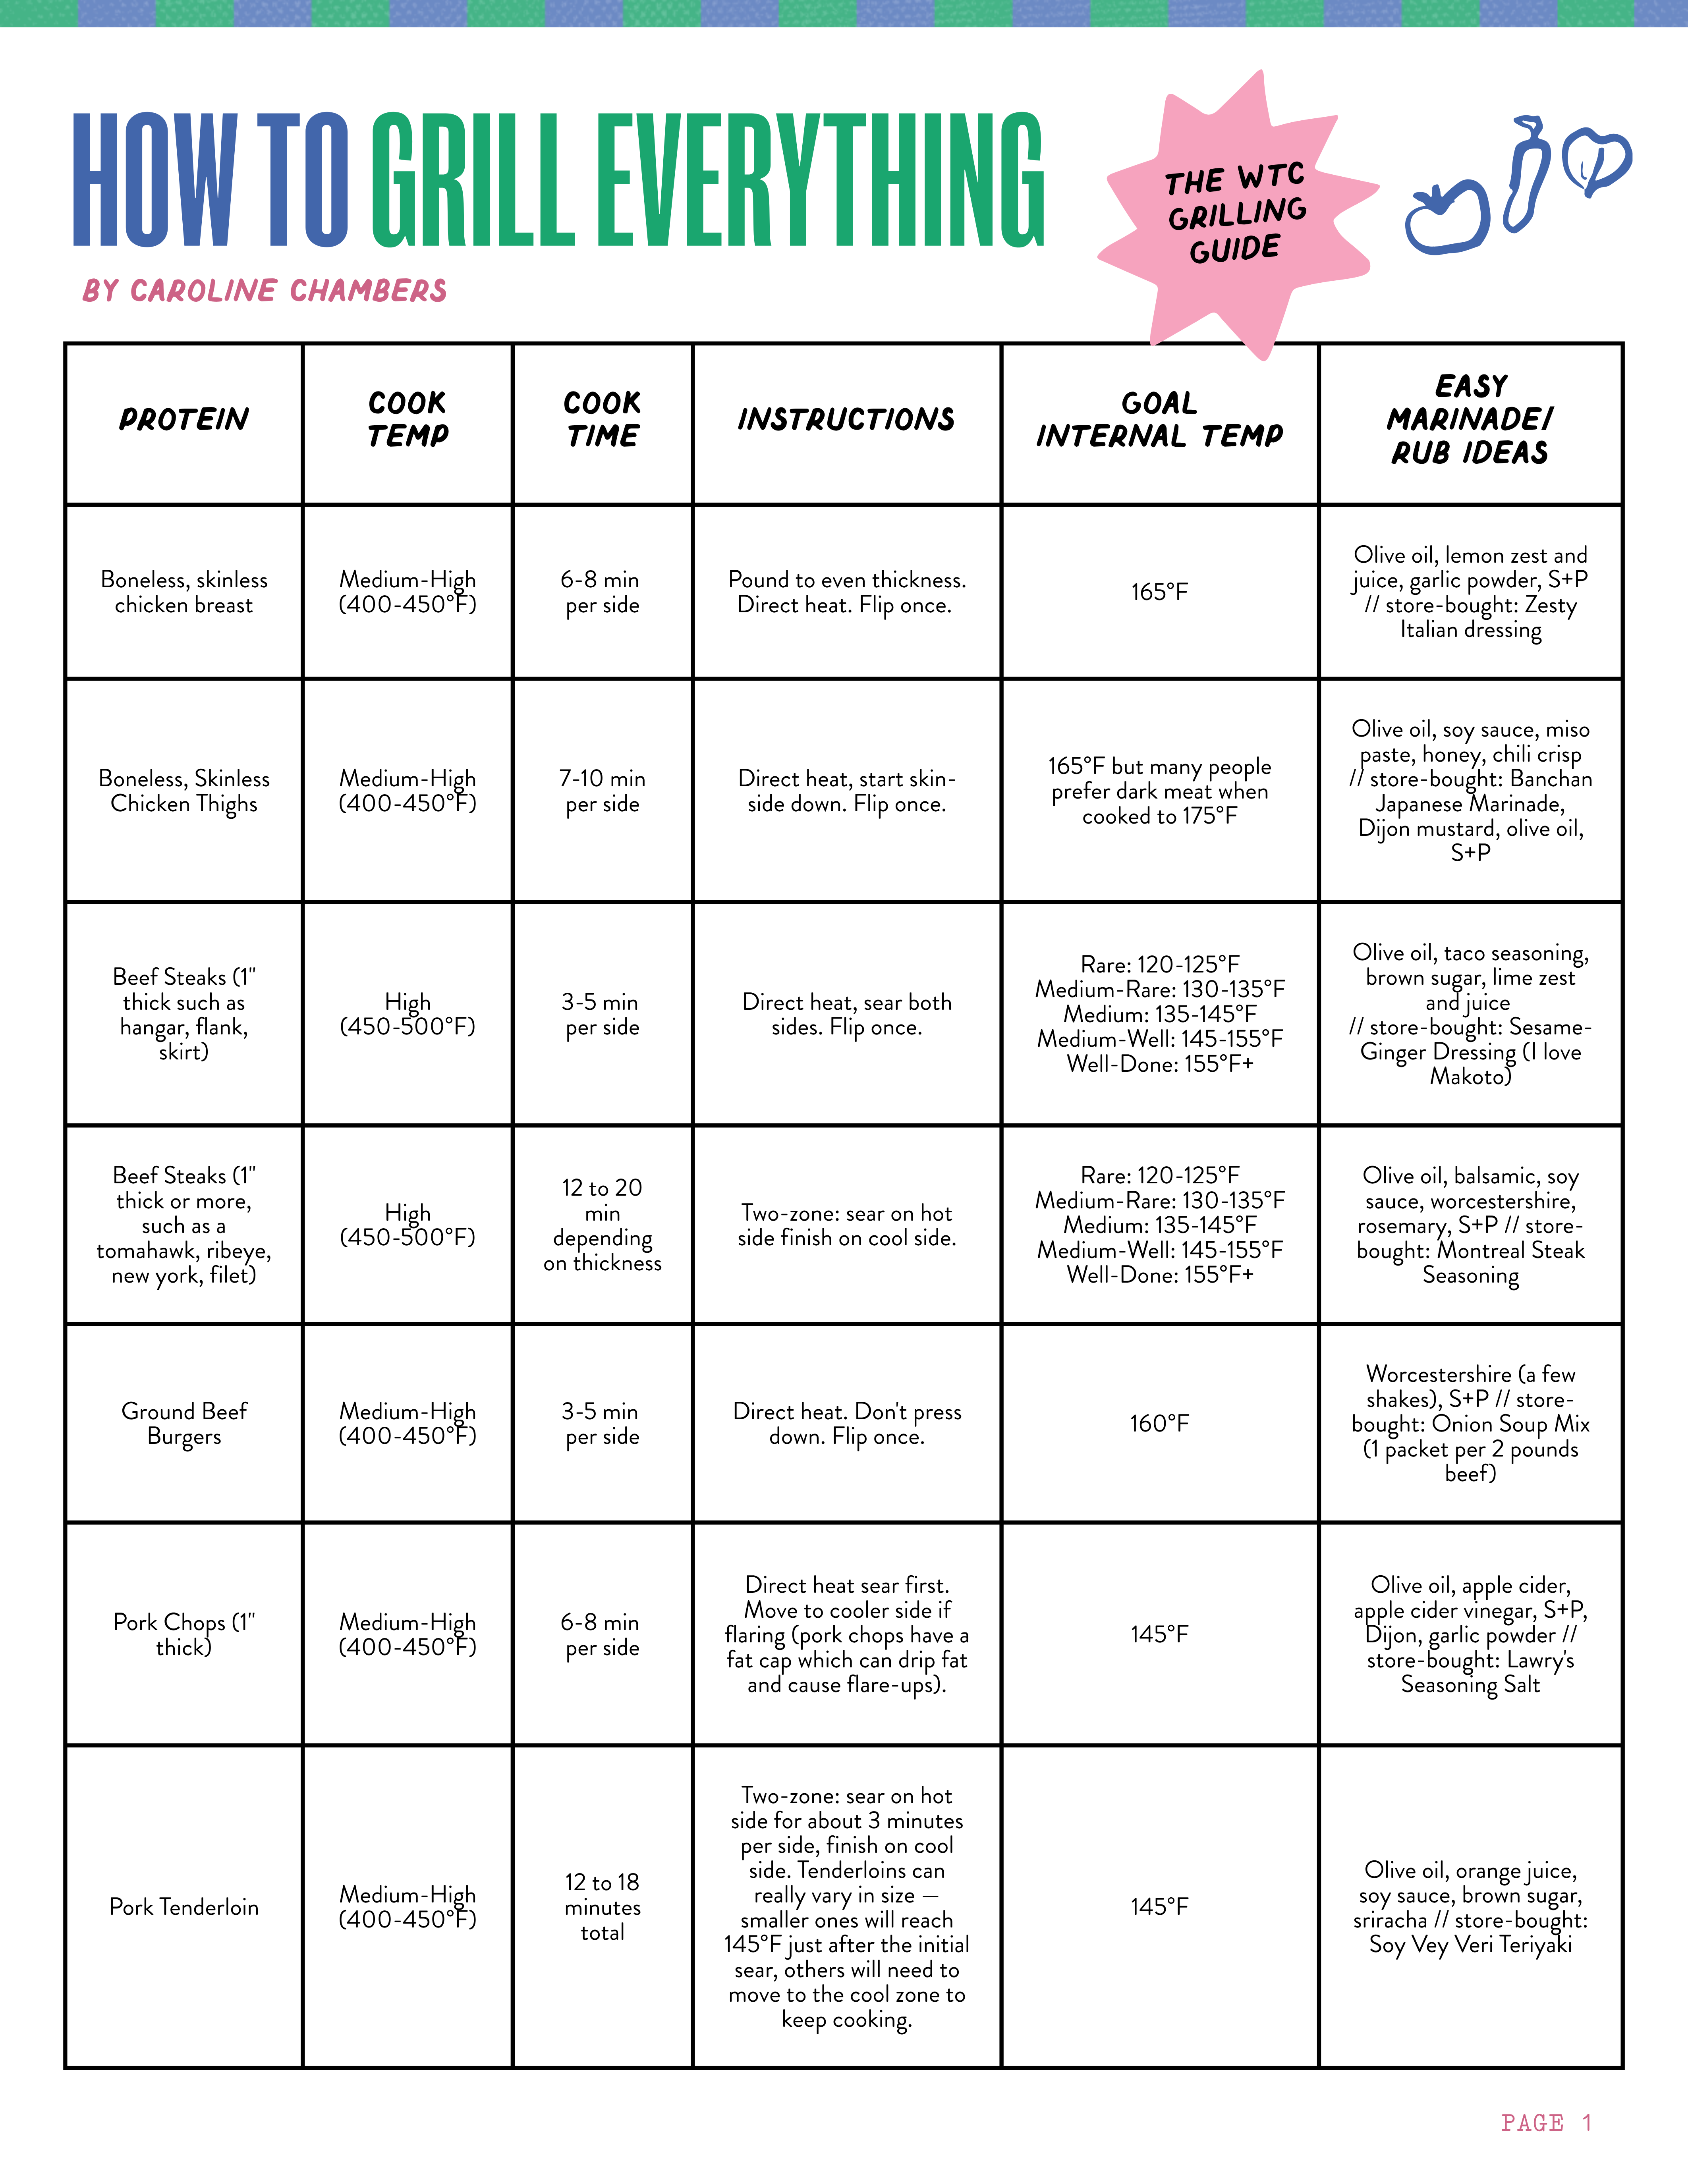
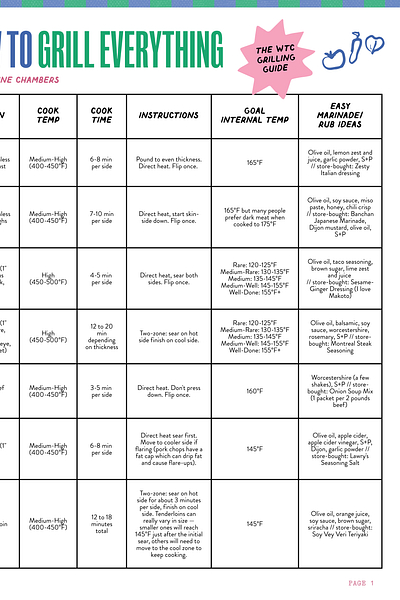
Cook times, temps, and instructions for 14 common grilling proteins — print this off and refer to it when grilling!


Solutions to your most frequent grilling issues!
Flare ups: Move the food to the cooler side, let flames die down, then continue with cooking.
To prevent flare ups in the future, be sure to shake off as much marinade as possible before you add the protein to the grill, and don’t over-oil your grates to the point of dripping.
If the bottom of your grill keeps catching on fire every time you use it, it’s because there’s oil/grease build up down there and you need to clean your grill (not just the grates!).
If the base of the grill fully catches on fire — not just a little flare up — immediately turn off the burners, remove the food, and close the lid to cut off oxygen to the fire. If you have a propane tank, get away from the area until the fire goes out in case of explosion. If it’s getting bigger, call the fire department. This will not happen if you properly clean your grill at least once (or twice if you use it constantly) per year!
Your food is already totally charred on the outside, but still raw inside: Move it to indirect heat, close the lid, and be patient. Keep a constant-read meat thermometer in the meat, if possible.
Overcooked meat: Finely chop it, toss with a delicious sauce, and make tacos, wraps, sandwiches, or wraps with the meat. NBD.
Nothing's ready at the same time: Set up two-zone cooking with direct and indirect heat. Keep the finished items in foil on the cool/indirect heat side of the grill while you keep cooking the rest. But also, who cares, just eat room temp food, it’s delicious!

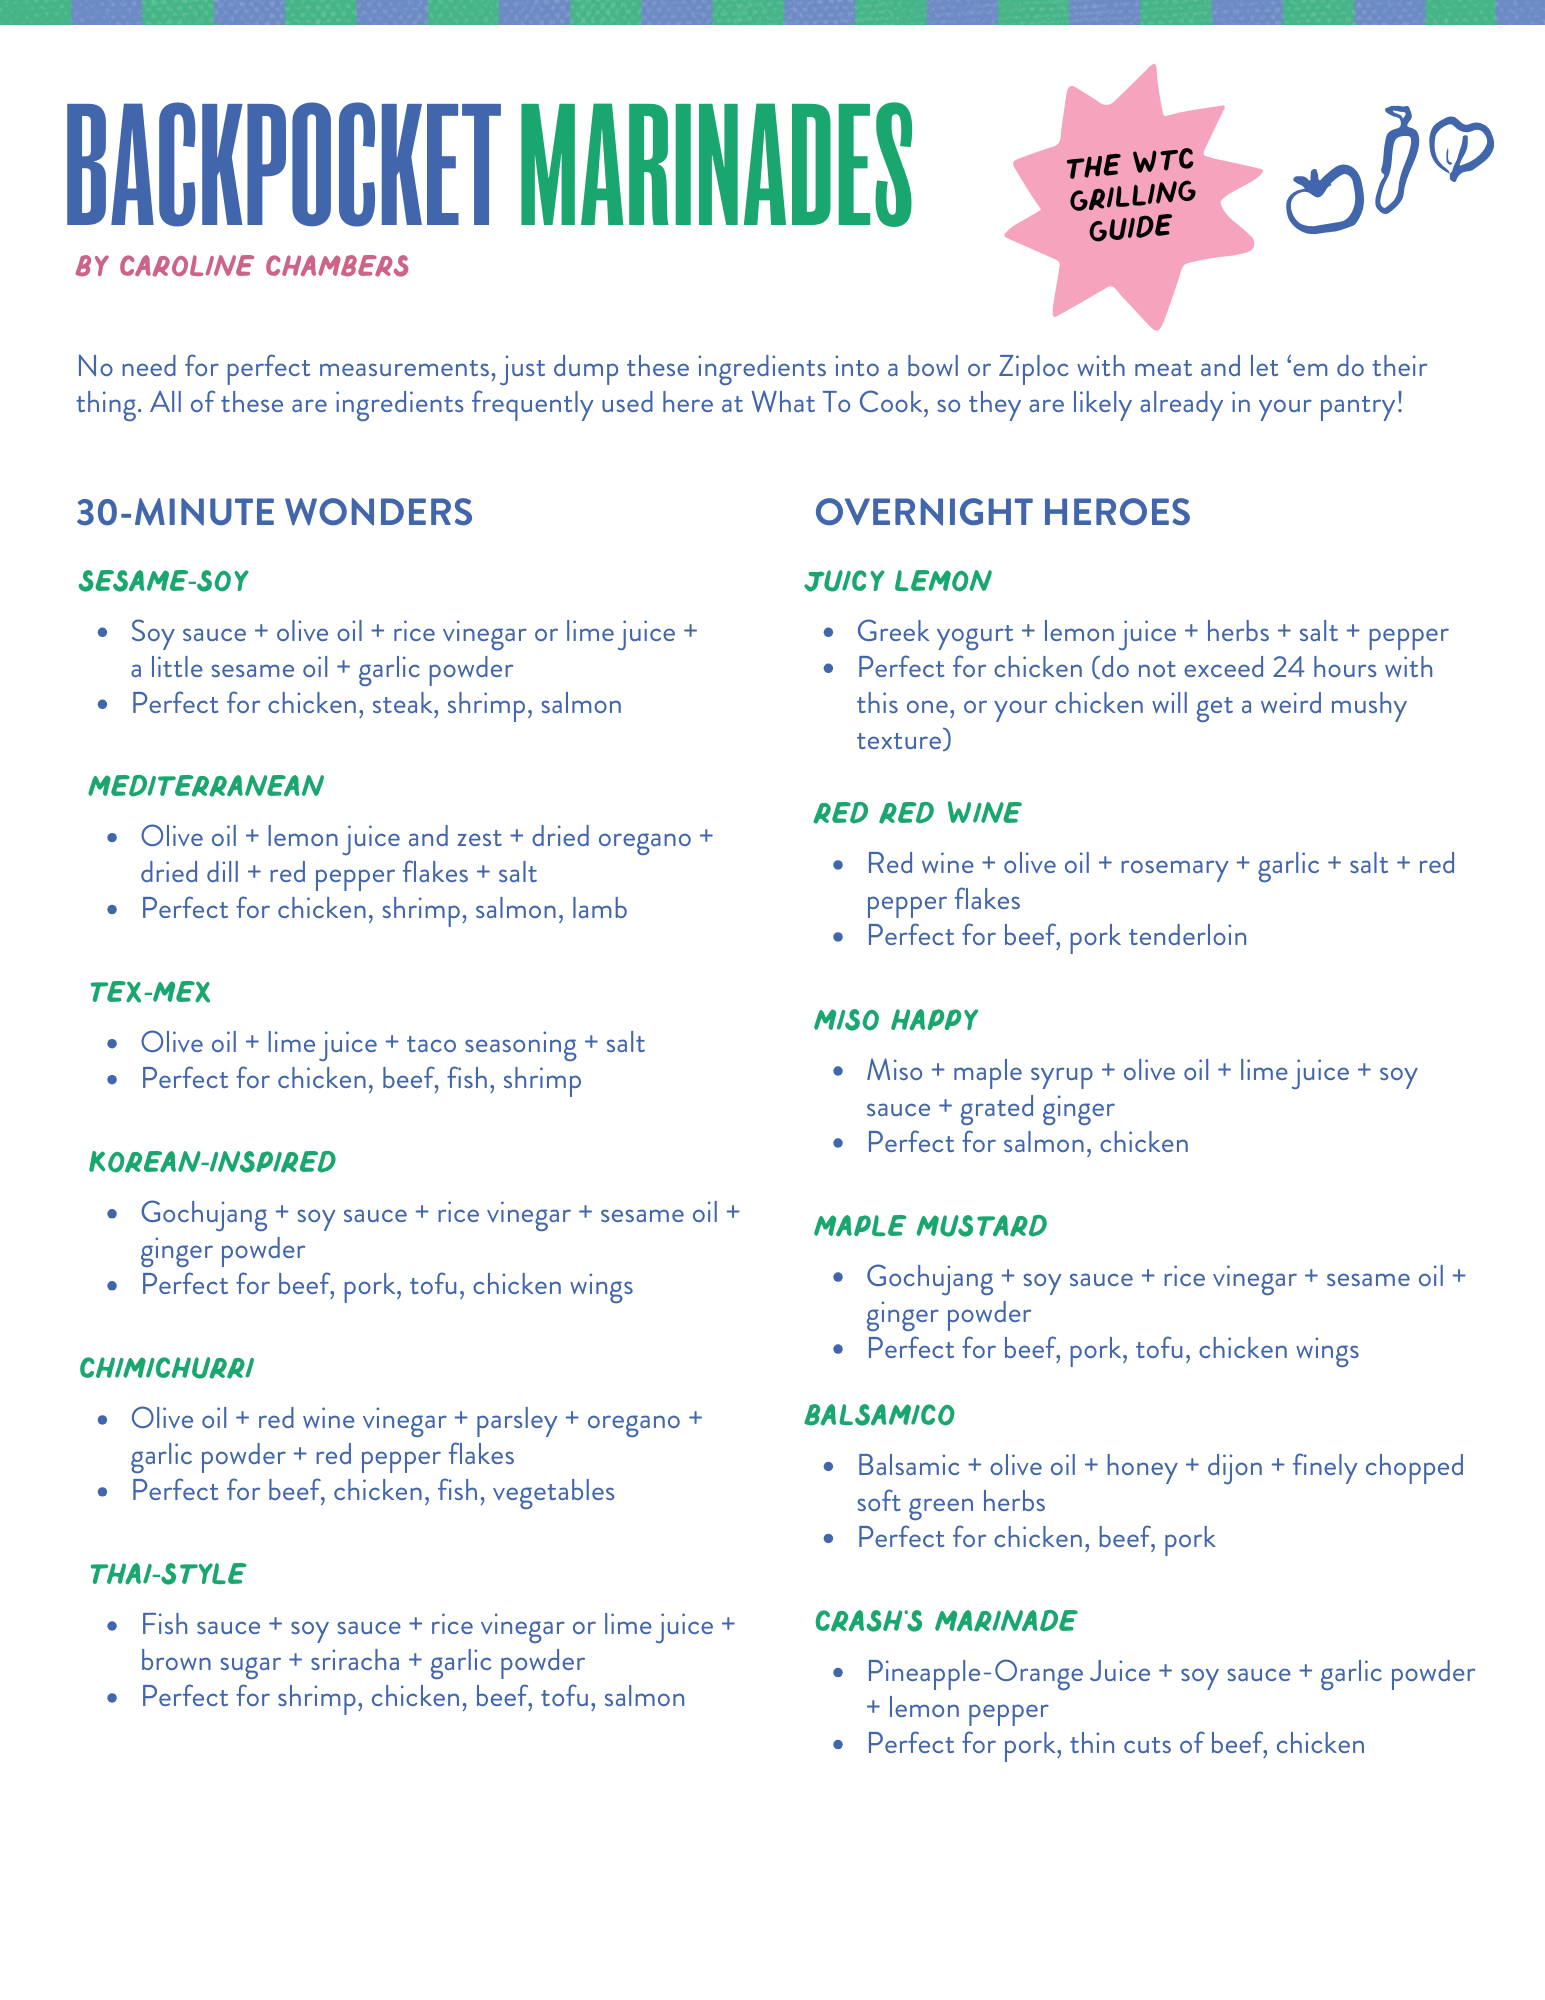
No need for perfect measurements, just dump these ingredients into a bowl or Ziploc with meat and let ‘em do their thing. All of these are ingredients frequently used here at What To Cook, so they are likely already in your pantry!
30-Minute Wonders
Sesame-Soy: Soy sauce + olive oil + rice vinegar or lime juice + a little sesame oil + garlic powder // perfect for chicken, salmon, shrimp, beef, pork tenderloin, tofu
Mediterranean: Olive oil + lemon juice and zest + dried oregano + dried dill + red pepper flakes + salt // perfect for chicken, shrimp, salmon, lamb
Tex-Mex: Olive oil + lime juice + taco seasoning + salt // perfect for chicken, beef, fish, shrimp
Korean-Inspired: Gochujang + soy sauce + rice vinegar + sesame oil + ginger powder // perfect for beef, pork, tofu, chicken wings
Chimichurri: Olive oil + red wine vinegar + parsley + oregano + garlic powder + red pepper flakes // perfect for beef, chicken, fish, vegetables
Thai-Style: Fish sauce + soy sauce + rice vinegar or lime juice + brown sugar + sriracha + garlic powder // perfect for shrimp, chicken, beef, tofu, salmon
Overnight Heroes
Juicy Lemon: Greek yogurt + lemon juice + herbs + salt + pepper // perfect for chicken (do not exceed 24 hours with this one, or your chicken will get a weird mushy texture)
Red Red Wine: Red wine + olive oil + rosemary + garlic + salt + red pepper flakes // perfect for beef, pork tenderloin
Miso Happy: Miso + maple syrup + olive oil + lime juice + soy sauce + grated ginger //perfect for salmon, chicken
Maple Mustard: Dijon + olive oil + vinegar + maple syrup + herbs + garlic // perfect for chicken, salmon, pork
Balsamico: Balsamic + olive oil + honey + dijon + finely chopped soft green herbs // perfect for chicken, beef, pork
Crash’s Marinade: Pineapple-orange juice + soy sauce + garlic powder + lemon pepper // perfect for pork, thin cuts of beef, chicken

A grilled protein + tasty toppings + good bread = a perfect meal.
Greek Style: Grilled chicken + tzatziki + cucumber + tomato in pita
Anything Can Be a Taco: Any grilled protein + quick slaw + sour cream + cheese + pico de gallo + hot sauce + tortillas
Banh Mi Inspired: Grilled pork + pickled vegetables + sriracha mayo in a Dave’s Sandwich Roll or baguette
Italian Sausage and Peppers: Grilled Italian sausage + grilled peppers + grilled onions + melty provolone on a toasted Dave’s Sandwich Roll spread with pesto and mayo
Steak Sandwich: Grilled steak + grilled mushrooms + grilled onions + provolone on a Dave’s Sandwich Roll or ciabatta spread with pesto

All are absolutely delicious on Dave’s Killer Bread burger buns!
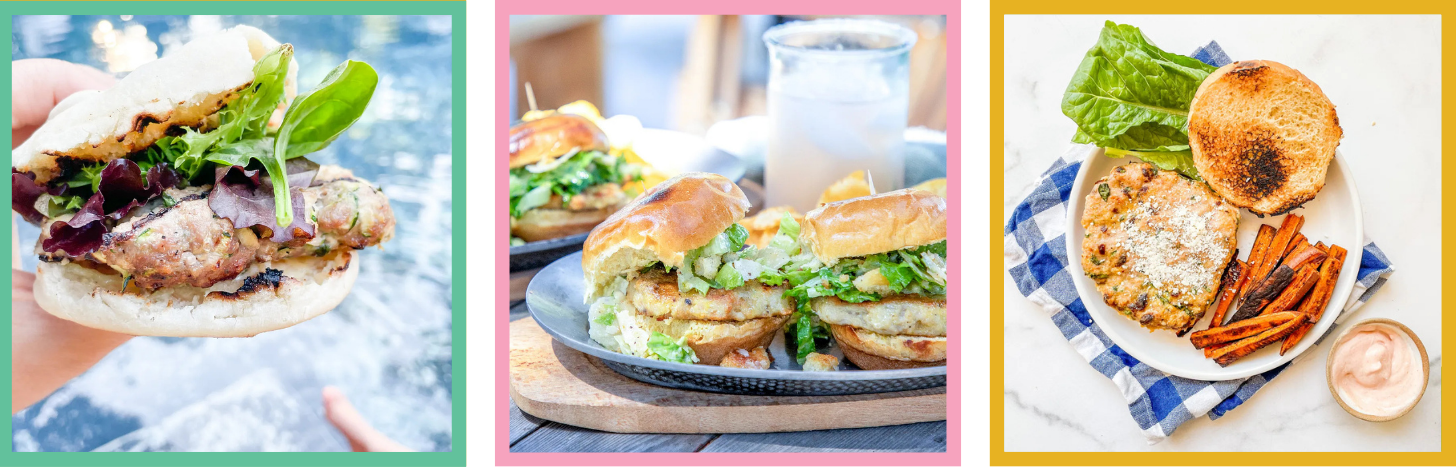
Cheddar turkey burgers (best to use a cast-iron skillet if grilling — they are very tender and tricky on the grill)
Juicy Lucys (AKA cheese-stuffed burgers from Gaby Dalkin)

More WTC community-favorite grilling recipes!

Beef:
Chicken:
Pork:
Other (seafood, veggies, apps, and dessert!):
Grilled brie and grapes (from Gaby Dalkin)
Grilled Caesar salad with garlic croutons (from Gaby Dalkin)

Easy sides to cook on one side of the grill while your meat cooks on the other! The ultimate multi-tasking!
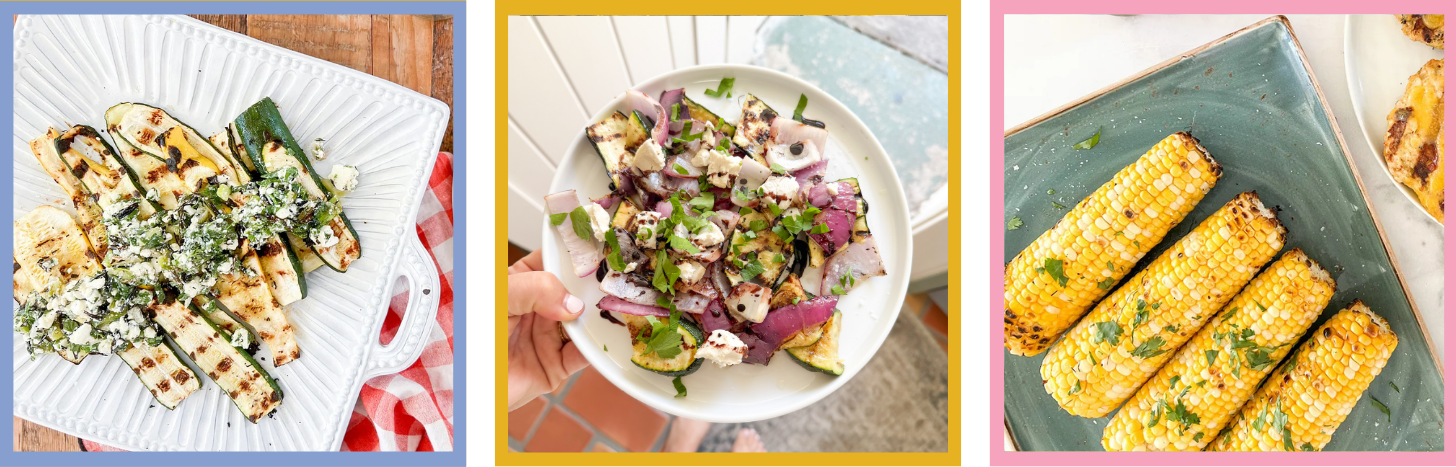
Easy grilled vegetables: Toss cut vegetables in a bowl with oil and desired seasonings, throw in a grill basket, grill for 8 to 12 minutes, shaking the basket every 3 to 4 minutes (shake it off the grill to avoid flare ups).
Grilled corn: Remove the husk, brush the cob with oil, grill on medium-high heat until charred all over, then rub with butter, lime juice, and salt.
Grilled bread: Slice a baguette or sandwich roll in half lengthwise, grill cut-side down for 2 minutes or until grill marks appear, rub with a raw garlic clove, smear butter all over, and sprinkle with flaky salt.
Grilled summer squash and zucchini: Remove the ends and cut them into long thin planks. Lightly coat with olive oil and season with salt, pepper, and a little Italian seasoning. Grill for 4 minutes per side or until dark grill marks appear and they’re very tender. Delish as is, or drizzle with marinated goat cheese, or pull apart a burrata ball and place it over top. Drizzle with balsamic.
Grilled cherry tomatoes with burrata: Toss cherry tomatoes with a little olive oil, balsamic, salt, and pepper. Place in a grill basket and grill until just starting to brown. Place on a platter and toss with lots of thinly sliced basil. Rip open a burrata ball and place it over top. Drizzle with more olive oil and balsamic. Serve with grilled bread or serve it all over arugula for a salad.
Smoky grilled eggplant with tahini drizzle: Cut eggplant into thick rounds, sprinkle with kosher salt, let sit for 30 minutes, then pat dry. Grill 5 to 6 minutes per side or until VERY tender to the point of being called “squishy.” Drizzle with tahini thinned out with lemon juice and water, plus a sprinkle of freshly chopped herbs.
Grilled asparagus with balsamic glaze: Trim the woody ends off asparagus, toss with olive oil and salt, and grill for 6 to 8 minutes, rolling occasionally. Remove from grill, drizzle with store-bought balsamic glaze, and top with toasted pine nuts.
Grilled bell peppers and red onions: Cut peppers into 3 big pieces and onions into thick wedges. Spray with cooking spray. Grill peppers for 8 to 10 minutes and onions for 12 to 15 minutes until caramelized. Place on a platter and finish with olive oil, a splash of red wine vinegar, kosher salt and pepper, freshly chopped parsley or basil, and crumbled feta or goat cheese.
HAPPY GRILLING! Here’s a link to printables from this guide (PDFs of the cheat sheets are included above, as well).
I’d love to know what your favorite meals to cook on the grill are!
This is epic. I just know how long this probably took to make so THANK YOU.
Love love love. Thank you for taking the intimidation out of grilling!