

Today’s knife skills guide and video tutorial are sponsored by Victorinox, maker of the original Swiss Army Knife. Victorinox has been manufacturing knives in Ibach, Switzerland, since 1884. They are known for their professional grade knives for the home chef (their knives are used in professional kitchens around the world). I have long used Victorinox knives in my own kitchen (I’ve had the same Victorinox serrated knife since my first post-grad kitchen in NYC!) and love them for their high-quality blades and comfortable handles — they also offer a lifetime warranty(!). Thank you for your support, Victorinox!
In my opinion, a lack of knife skills is the number one roadblock standing in the way of more people cooking home-cooked meals — especially those containing an abundance of nutrient-rich vegetables — more often. I am the first to endorse using pre-sliced cabbage, pre-sliced mushrooms, pre-chopped kale, pre-cubed squash, store-bought mirepoix, etc., in an effort to make weeknight cooking faster and easier, but if you always try to avoid chopping, you’ll miss out on making some very delicious food.
Feeling comfortable while chopping not only makes it less intimidating to cook chop-heavy recipes, it also gets dinner on the table faster and more efficiently (which is why we’re all here, right?!).
If you think you’re a bad cook, you probably were just never taught the proper knife skills to feel cool and confident in the kitchen. My least favorite comment to see on a WTC recipe is “loved this, but it took me forever to chop everything!” Knife skills are a learned skill, but no one is being taught them anymore, despite the fact that we all have to have proper knife skills to get dinner on the table every single night!
So today, I am teaching you how to properly use kitchen knives.

Chopping is easier to show than tell, so I filmed a live video tutorial! I cannot recommend enough taking an hour and a half out of your week to take this class and practice your knife skills alongside me. Pause the video as needed, come back to it, but listen and watch and then do it. It’s like riding a bike, I promise!
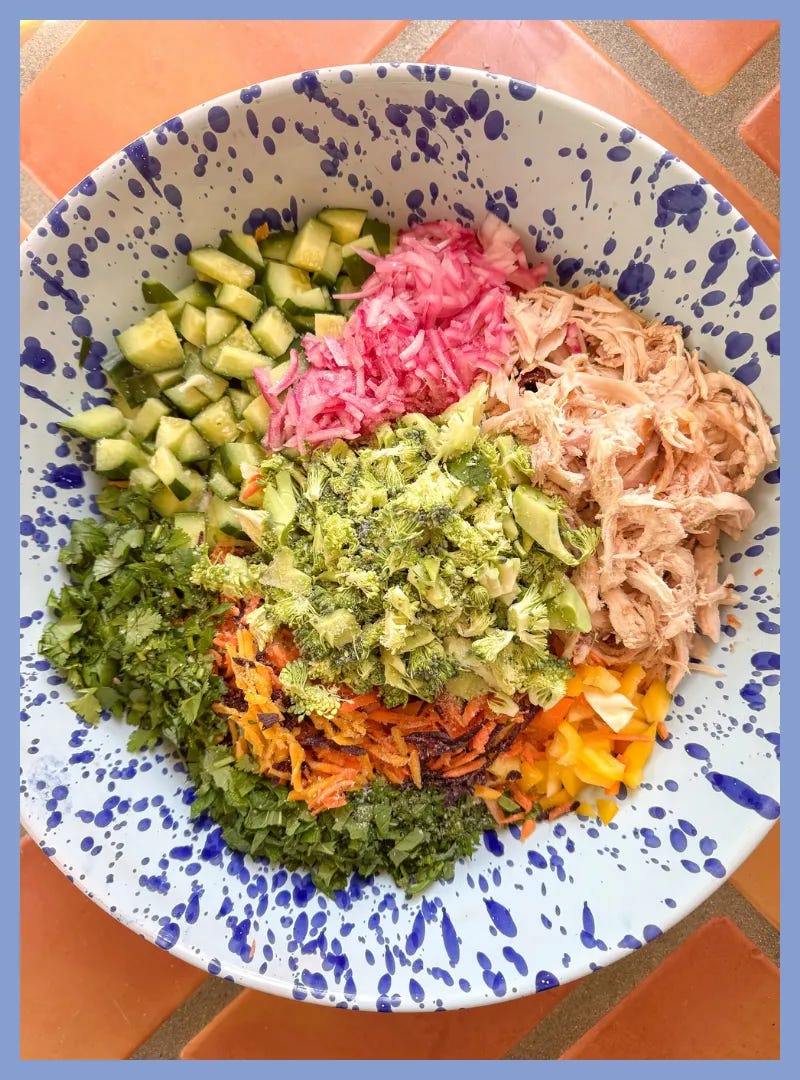
During the class we’re going to practice on veggies included in a chop-heavy What to Cook favorite: the rainbow chicken chop. That way, by the time you’re finished, you’ll be halfway through prepping a delicious meal. (You can also make a jar of pickled red onions with the onion you’ll slice!)
In the video tutorial and guide below, I:
Talk you through which knives you actually need (and a few others that are nice to have if you want to expand your collection)
Answer some other knife buying FAQs
Teach you how to sharpen, store, and care for your knives
Walk you through some other tools to keep close to your cutting board while you chop
Show you how to safely and efficiently chop, dice, mince, and slice veggies!
Click here for the list of tools and ingredients to have on hand when you take this class.

Again, I highly recommend watching the whole video above — ideally with the same tools and ingredients I’m using so you can practice along with me then fix the rainbow chicken chop for dinner and/or lunches for the week ahead.
Keep reading for important notes and resources that you can reference whenever you need. There are also a bunch of specific demo clips at the bottom of this guide!

In my opinion, there are only three or four knives any home chef needs to be successful in the kitchen. Here are the knives you need — and what you can do with each of them:
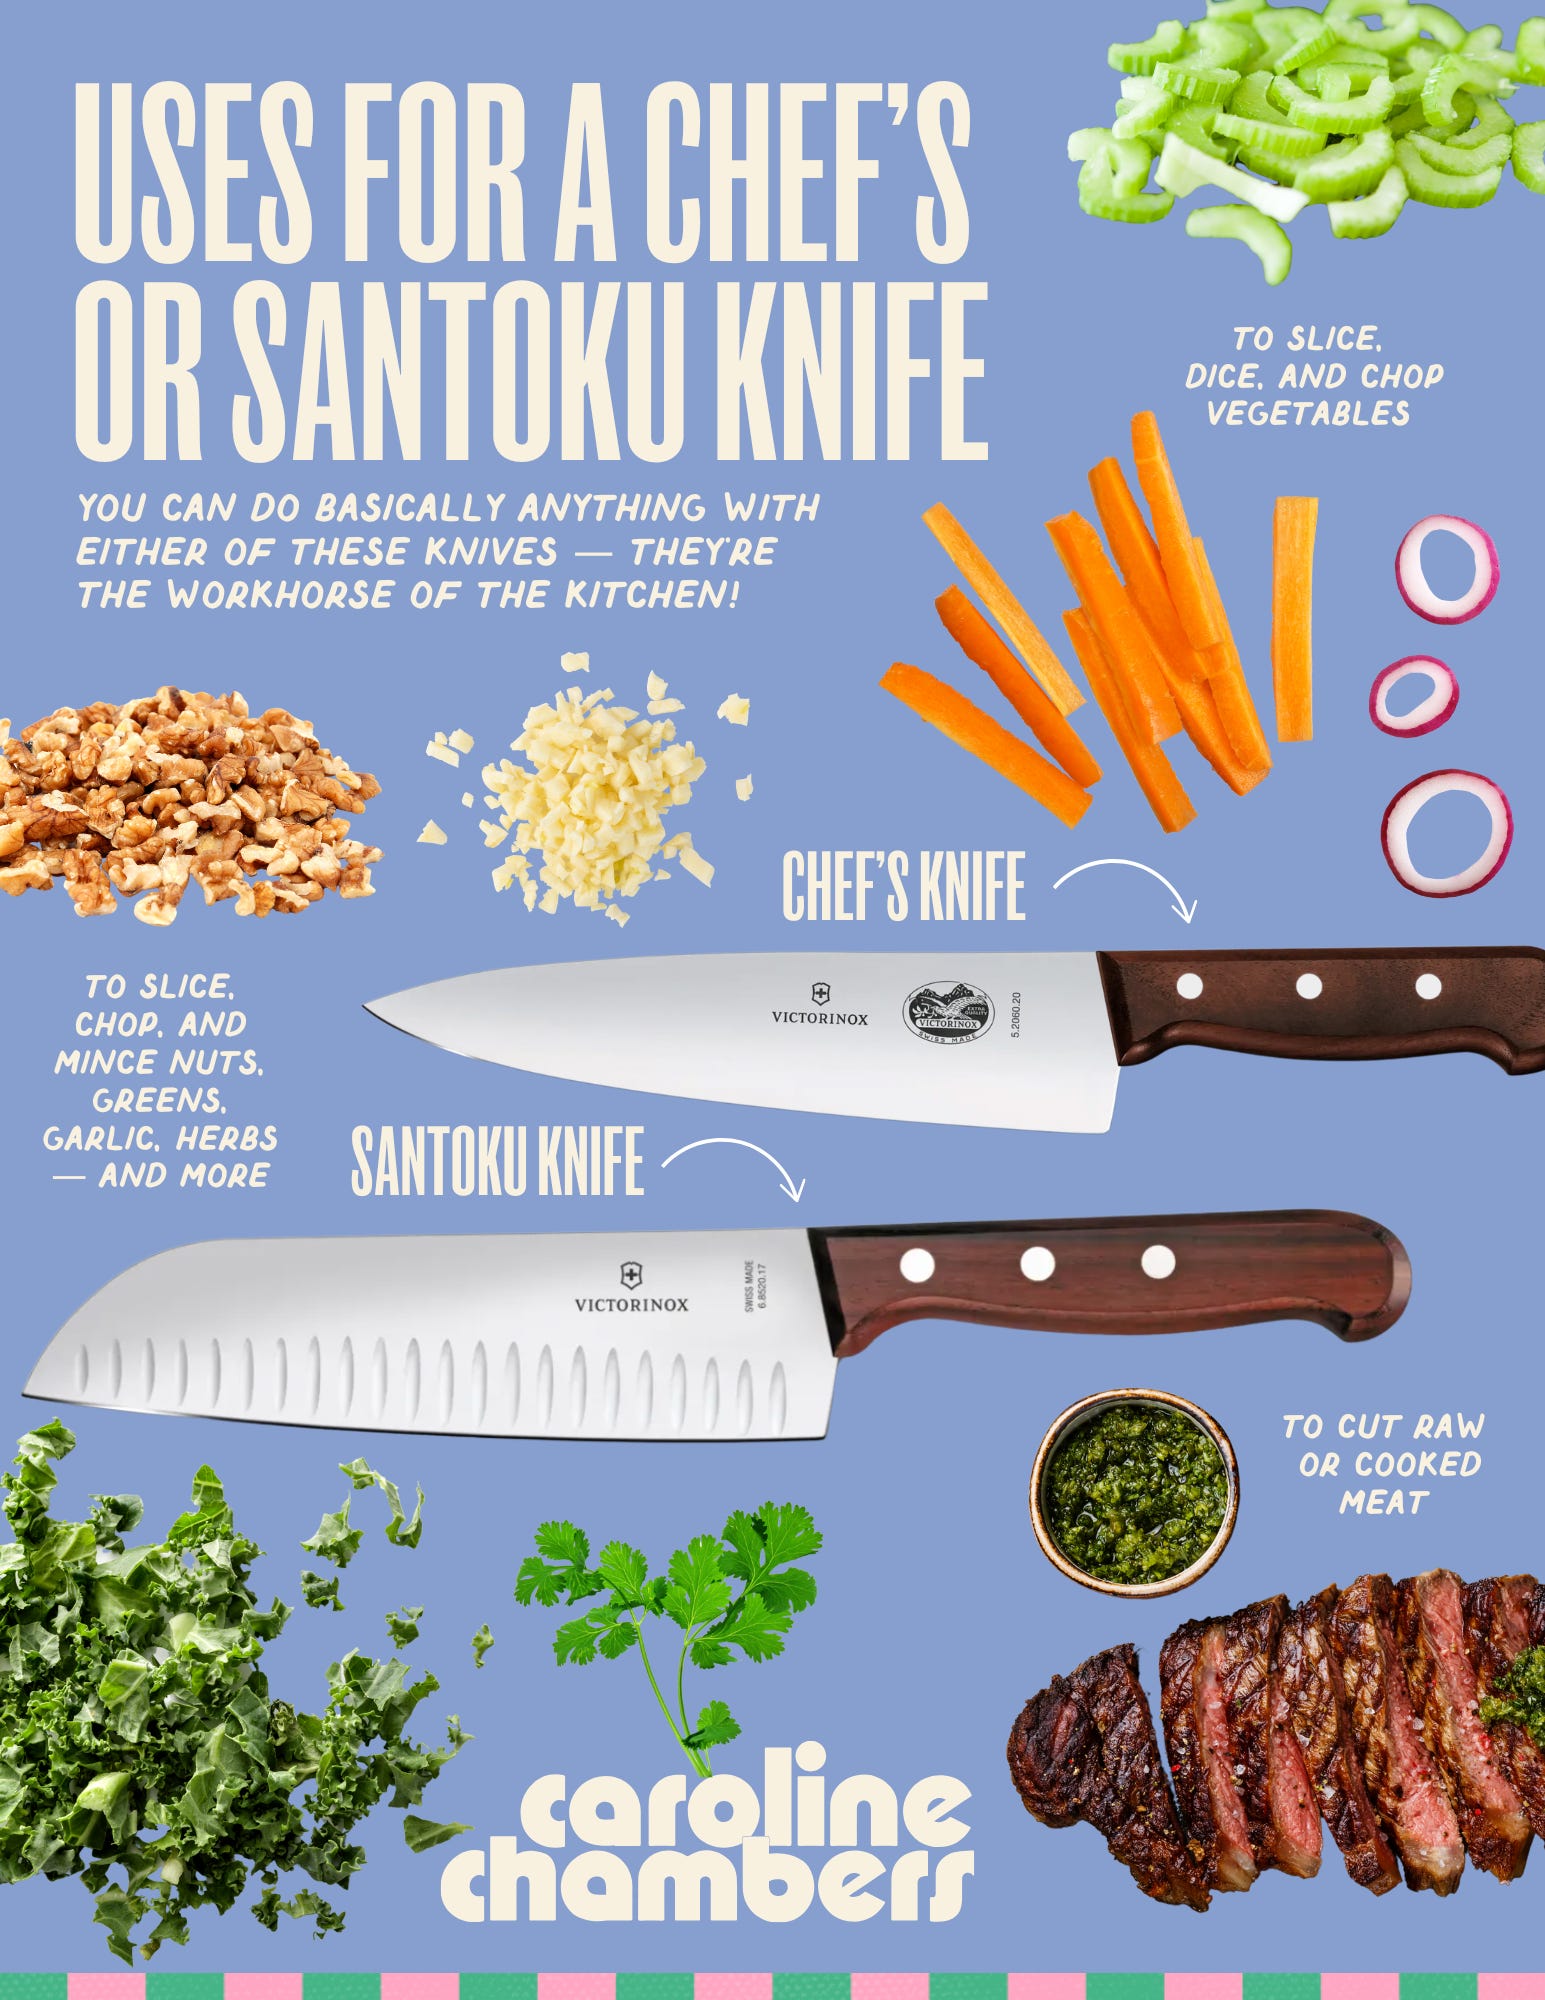
A chef’s knife and/or a santoku knife. You can have both (ideal), but you really only need one. A chef’s knife allows for more precision as it tapers to a sharp point at the end, while a santoku knife — which is wider and has more steel toward the tip of the blade — allows you to cut deeply further into a vegetable or meat. I use my santoku most often. PS, the Victorinox chef’s knife is sometimes labeled a “carving knife” (like the one we linked)!
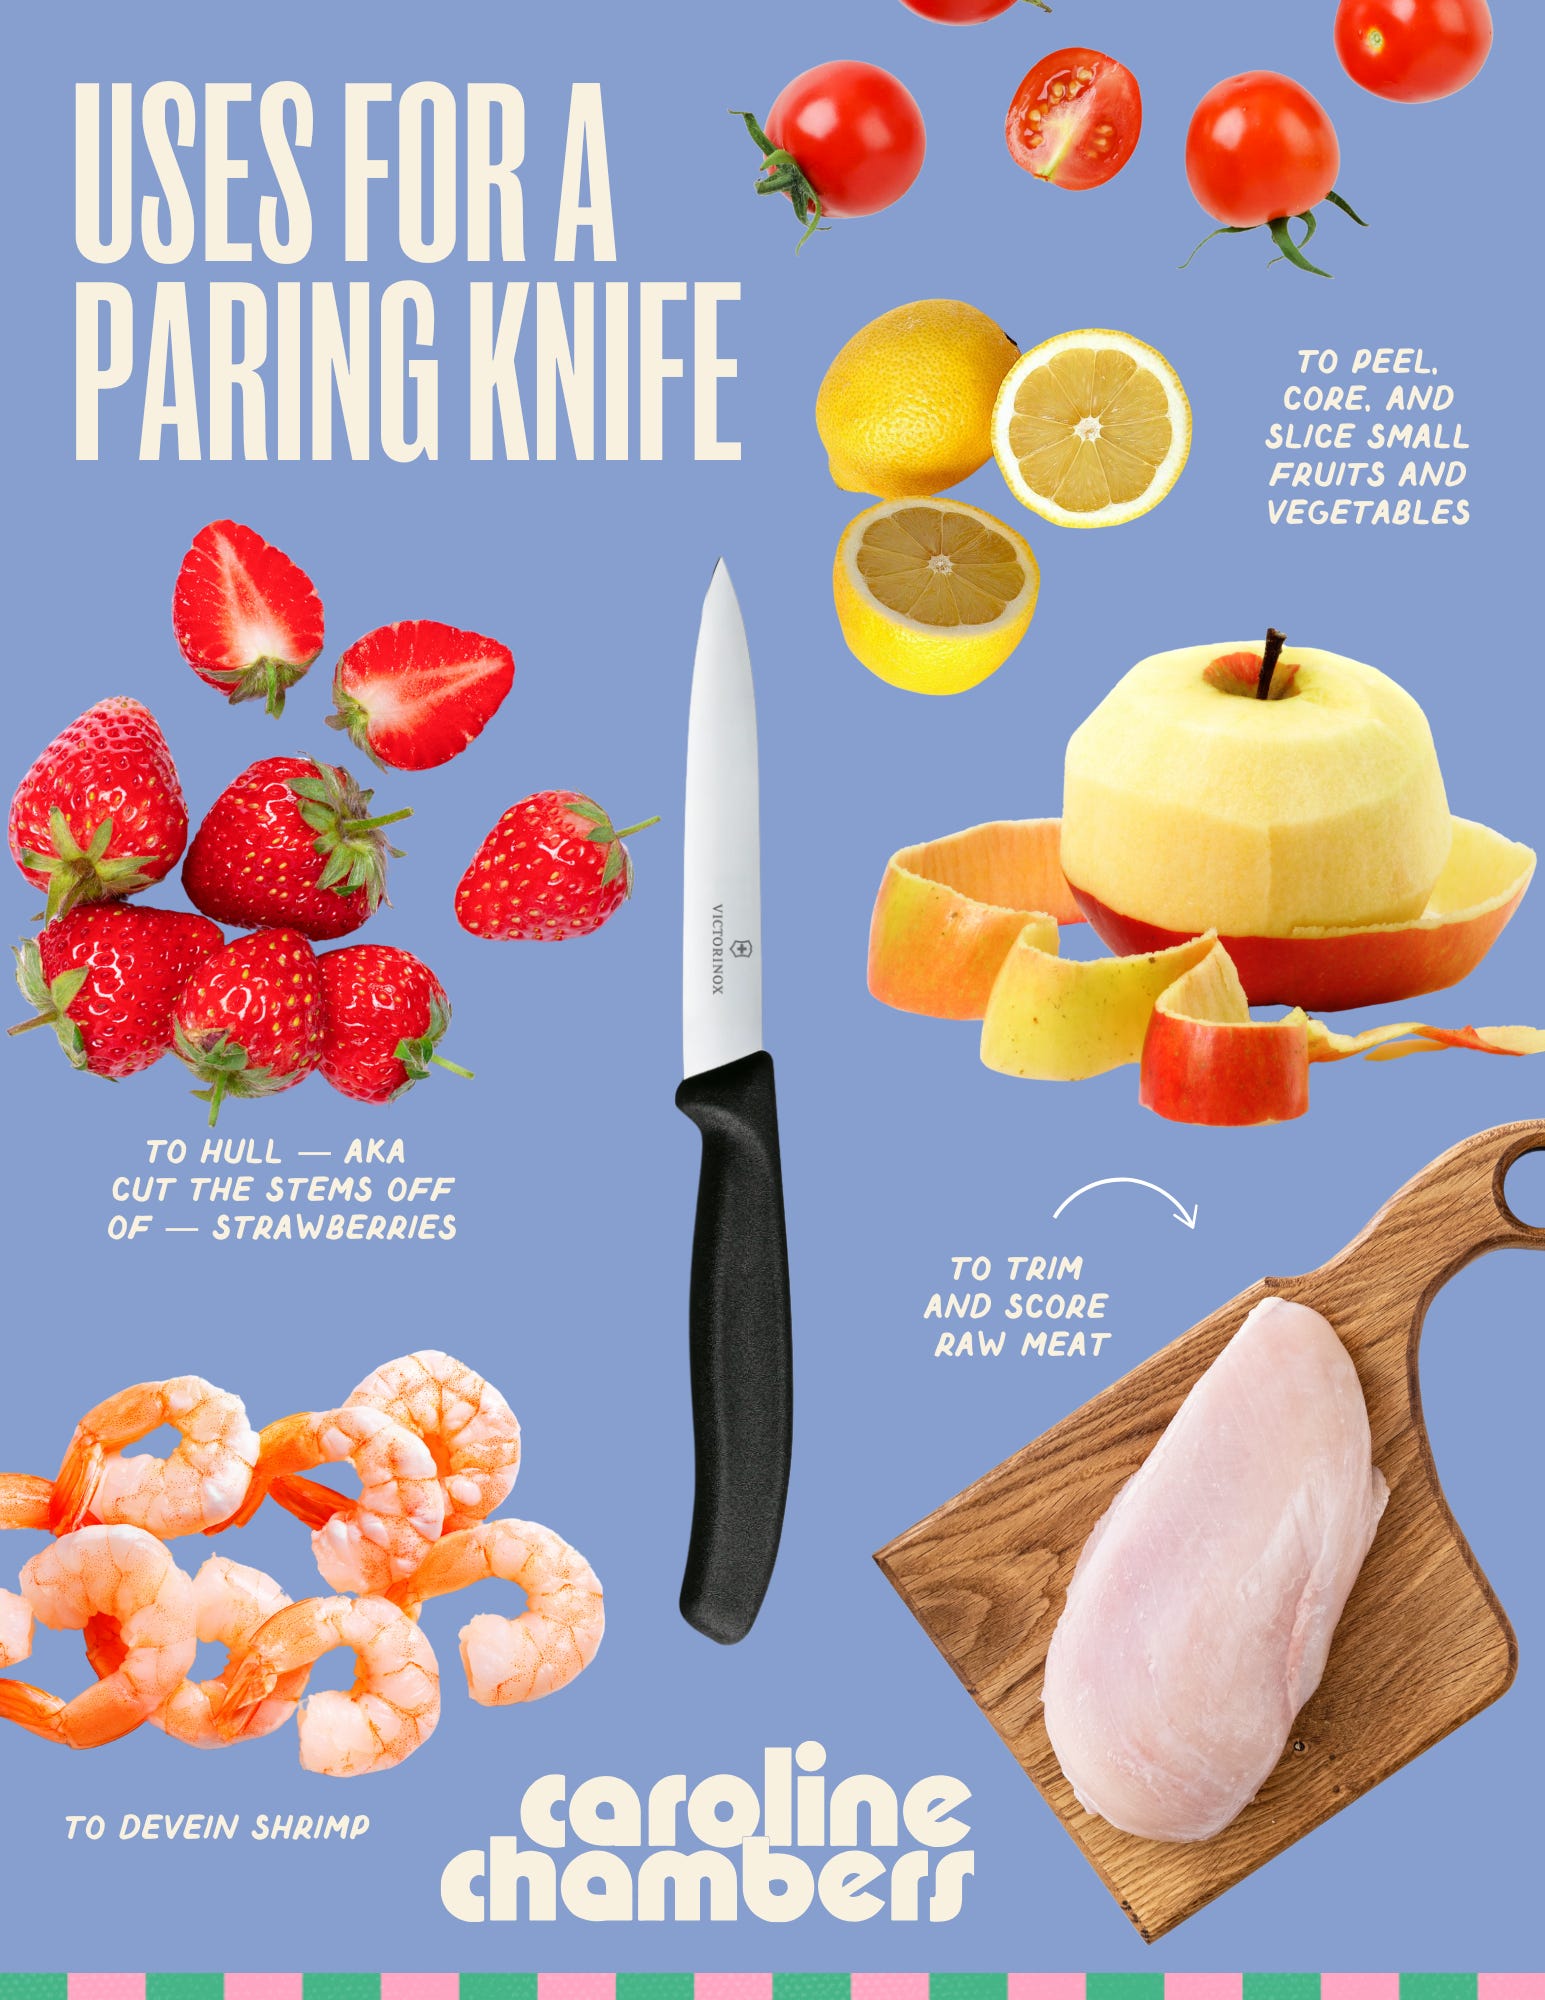
A paring knife. These small knives are great for making precise cuts on small ingredients — like hulling (or removing the stems from) strawberries and deveining shrimp — and for slicing or cutting small items like lemons, grapes, or cherry tomatoes. I honestly don’t use my paring knife often, I use my santoku or chef’s knives for almost everything! One exception to this is trimming raw meat — it’s nice to use my paring knife to cut the fat from and/or to score raw meat so that it doesn’t dirty my other knife.
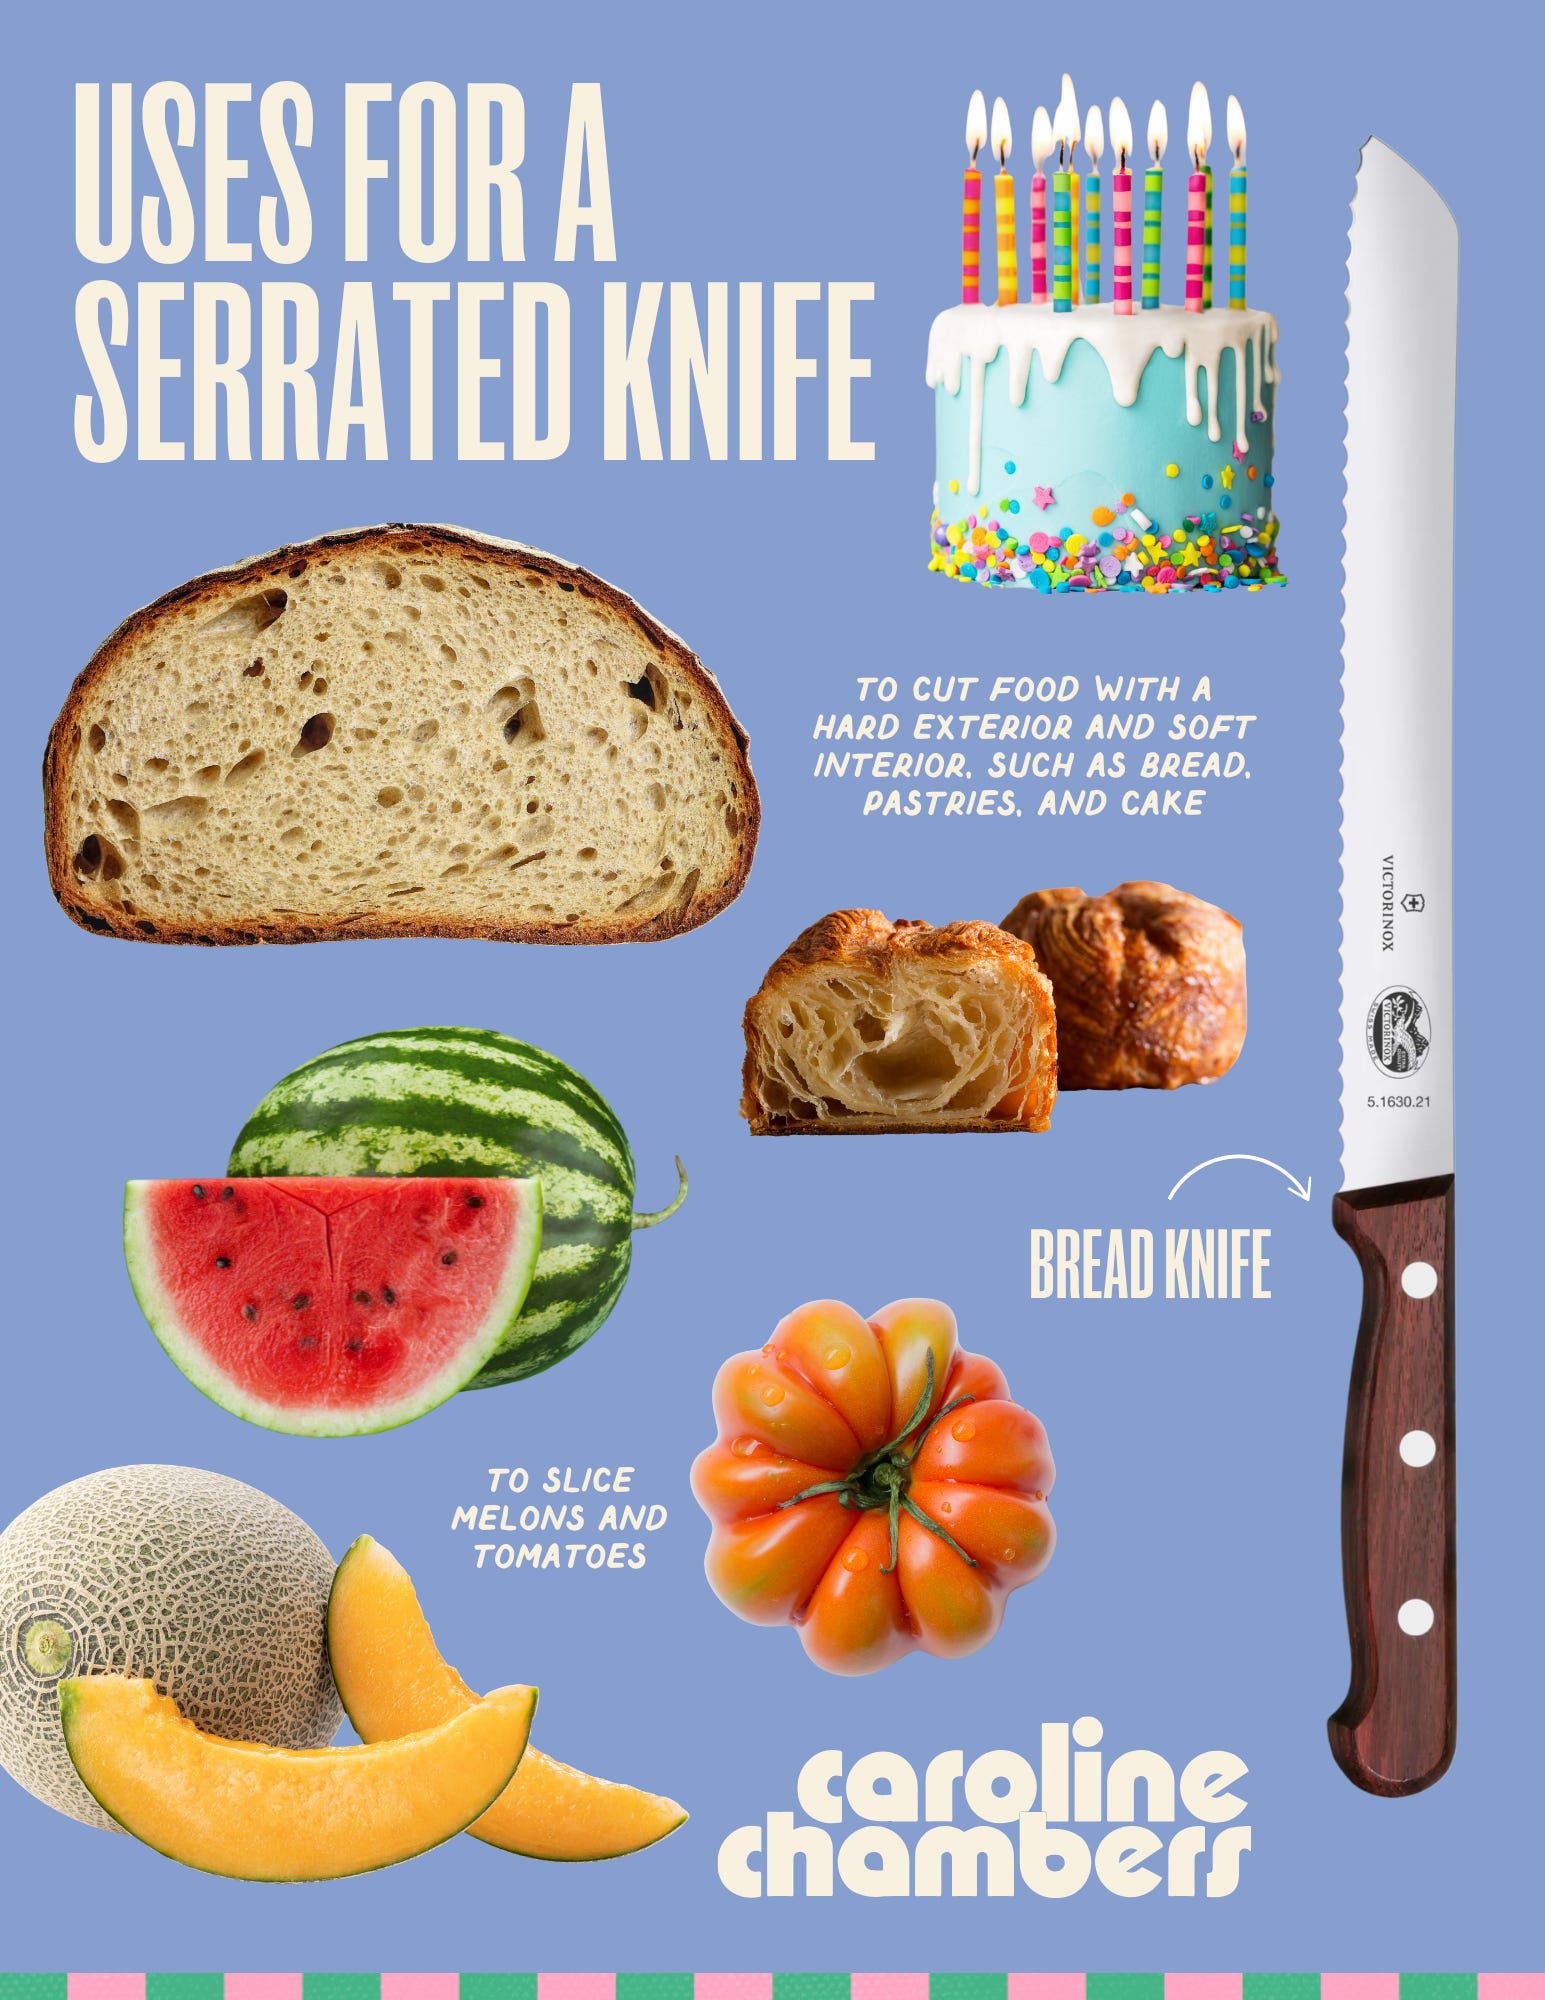
A serrated knife. Honestly, a really sharp chef’s or santoku knife could take the place of a serrated knife, but it’s handy to have if you have the space in your kitchen. Serrated knives come in different sizes (for example, you can get a serrated paring knife), but if you only have one serrated knife I recommend buying a bread knife, which has a long serrated blade. Bread knives are great for cutting food with a hard exterior and soft interior, like loaves of bread, pastries, cakes, and tomatoes. I also sometimes use my bread knife to cut big melons like watermelon and cantaloupe.
In case you’re a visual learner…
While those are the essentials, if you want to expand your collection, these are also nice to have:
Kitchen shears: With these you can cut packaged meats, snip herbs, and more.
A cleaver: A cleaver is a large, heavy knife with a rectangular blade. It’s ideal for butchering meat and other tough tasks.
A nakiri knife: This Japanese knife has a thin, straight, rectangular blade. It’s great for chopping vegetables paper thin. The edge comes in full contact with the cutting board, allowing thorough and efficient chopping.
A santoku knife if you have a chef’s knife (or vice versa!). See definitions of those above.

Should I buy Western or Japanese style knives?
If you go knife shopping you’ll see that there are “Western” (AKA “European”) and “Japanese” style knives. Both are great and I have a mix of them in my knife collection! Here’s the difference:
Japanese knives are typically sharper and thinner than Western knives. They are great for precision and stay sharp longer, but are overall more brittle and delicate (a lesson I learned the hard way when I tried to carve a turkey with a fancy Japanese knife and nicked the blade!).
In general Western knives are thicker, heavier, and softer — they are known for their versatility and durability (like they could carve a turkey without getting damaged). They’re easier to sharpen, but also dull more quickly.
I think Western knives are a little easier for novice cooks. I have and use both — it’s really all about personal preference.
What are those indentations on the side of some blades?
A hollow — also known as a Granton or fluted edge — blade is a knife with indentations/dimples along the sides of the blade. The dimples prevent food from sticking to the whole blade — instead, they create tiny air pockets for the knife to glide through with less friction, allowing you to chop easier. It’s not a must for a home chef, but if you regularly chop a ton it can be helpful.
What else should I consider when buying a knife?
Length: Chef’s and santoku knives often come in a variety of length options, like 6-, 8-, and 10-inch. I love using a 6-inch for a lot of things (like bell peppers, onion, etc.) but I also like having longer knives for bigger veggies like butternut squash. If you’re only buying one, I’d go with an 8-inch.
Quality of the blade: Stainless steel and carbon steel are both great options — quality/sourcing of the steel varies by knife brand. For example, Victorinox has a proprietary stainless steel recipe that helps it stay sharp longer and allows for easy resharpening!

Sharpening
I don’t technically sharpen my knives at home. Once a month I take my knives out to have them professionally sharpened. I have a guy at my local farmer’s market who does this, but you can take them to a local hardware store, Williams Sonoma, or Sur la Table to have yours sharpened. Google to find somewhere in your area that offers this!
Honing
In between those visits, I use a honing rod, which helps straighten your blade. I cannot stress enough that your knife should glide easily through what you’re cutting. If you’re having to push down on it really hard, that’s neither efficient nor safe and you need to hone or sharpen your knives!
Watch the video for my honing technique — I just swipe the blade about four times each side. It won’t look any different but will really help. Clean the blade well before and after you hone! I do this about once a week, or before a really big chop session (like before I make the rainbow chicken chop).
Storing + cleaning
I store my knives using an in-drawer knife holder.
It’s always best practice to hand wash your knives so they don’t get banged up/unsharpened in the dishwasher. It’s ideal to hand wash your knife right when you’re done chopping using hot water (or hot water plus dish soap, if they’ve touched meat or are greasy), then immediately hand dry it using a dish towel.
If you must put a knife in the dishwasher, make sure you have space (like a top drawer rack) where it won’t touch other items. And NEVER put a wooden-handled knife in the dishwasher. The heat can compromise the integrity of the wood/handle.
How I wash my cutting board: While I’m chopping I keep it dry with a dish cloth, but to clean it I use Seventh Generation Foaming Dish Spray. I suds it up then use a damp towel/sponge to wipe it clean.

You have your knives — now what? Here are the tools I recommend having handy when you go to chop your veggies:
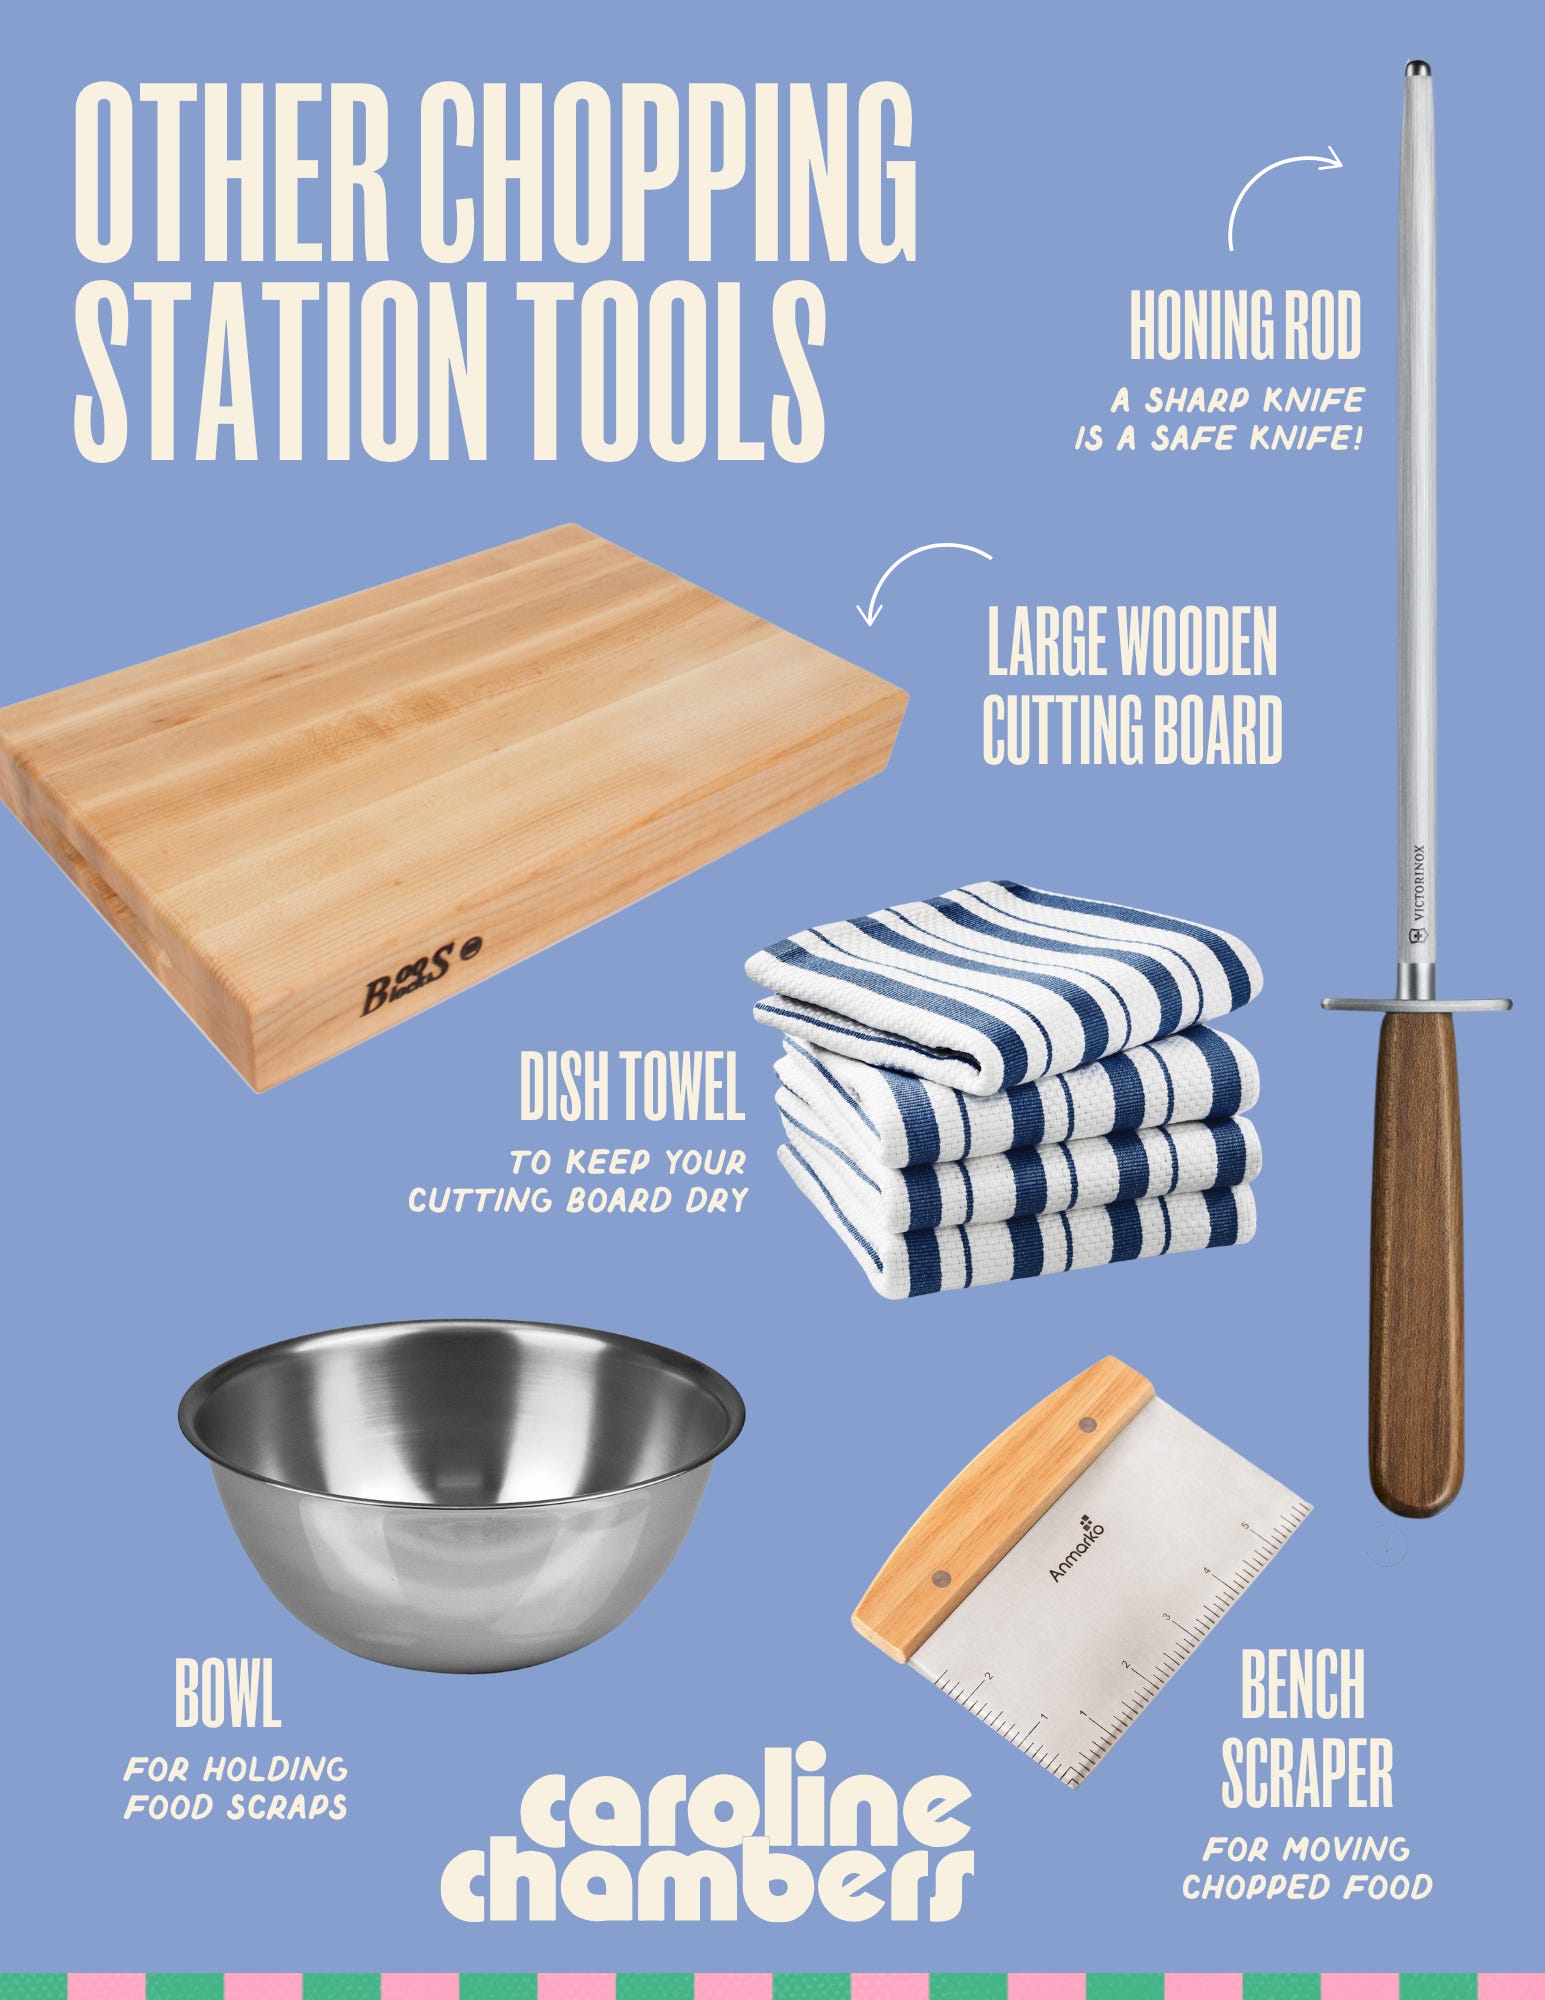
A large, solid wooden cutting board. I use my Boos Block for almost everything except for beets, because they stain it, and raw meat, because it feels gross, even though wood is actually antimicrobial and it’s totally fine if cleaned properly! I even use it for onions and garlic (I just scrub it with salt and a cut lemon to get the smell out)!
A cutting board for meat. I like paper composite boards like this one, which is dishwasher-safe and has a generous juice groove that catches liquid when cutting, eliminating messy countertops. It’s also dual sided. I use this for raw meat, beets, and really juice fruit.
A honing rod. We’ve already discussed this but it bears repeating! I know it seems counterintuitive, but a sharp knife is a safe knife. When your knife glides through food effortlessly, you’re at less risk of it slipping (and cutting you). Reminder to wipe your blade clean after you’ve honed it!
A bowl for scraps. To make chopping as efficient and safe as possible, keep your cutting board clear. I always keep a bowl right next to my cutting board so I have somewhere nearby to put my food scraps. It helps make clean up easy too! You can move chopped veggies into the pot or bowl you’ll be cooking them in, or into other mixing bowls to keep them out of your knife’s way.
A dish towel. There are two good uses for a dish towel:
1) If your cutting board is wobbly at all, you can lightly dampen a dish towel and lay it out underneath your cutting board to make it perfectly still and steady. Do not cut on a wobbly board!
2) If water accumulates on your cutting board while you’re chopping, you can use the towel to wipe it dry, which will help keep your cuts safe and precise.
Optional: a bench scraper. This isn’t a must, but it really is a handy tool. You can use a bench scraper to scoop up whatever you’ve chopped and move it to the skillet, a bowl, or wherever. It’s not great for your knife to scrape along the cutting board so this helps avoid that (if you don’t have a bench scraper, use the non-blade side of your knife instead! or just do it very lightly!). Bench scrapers are also helpful for baking projects — if you make bread, pizza dough, or baked goods often, you probably already have one.

In the video I demo how to dice, chop, slice, and mince some fundamental ingredients: onions, carrots, garlic, bell peppers, kale, potatoes, and more. I highly recommend watching, as it’s much more effective to show than it is to tell, but for reference, here are some key terms and important points:
How to hold your knife
Fingers on the blade: Rather than gripping your knife like a hammer, you want your thumb to be on one side of the blade and your inner forefinger to be wrapped around the other side. This feels weird and counterintuitive, but it gives you more control and makes it more comfortable.
The claw: You’ll hold your knife with your dominant hand, and the veggie you’re chopping with your non-dominant hand. You want to curl the fingers of your non-dominant hand under into a claw shape, so that your knuckles stop the knife from being able to nick your fingers!
Chopping vs. slicing vs. dicing vs. mincing
Rough chopping = cutting food into non-perfect, roughly same-sized pieces. If you are going to purée your veggies (like for a soup), always, always roughly chop them. Do not waste time dicing something that isn’t going to keep its shape!
Dicing = cutting into small, uniform cubes. Dicing precisely allows food to cook evenly and/or look better
Mincing = cutting into very small pieces — finer than dicing
Slicing = cutting into strips/slices
Julienne = cutting into short, thin, even strips
FYI, the top knuckle of your thumb = roughly 1 inch. This will help you determine what a 1/8, 1/4, or 1/2-inch dice looks like!
A few tips to make cutting curved veggies easier
A cheater bar = a small slice off the side of a round ingredient (like a carrot, beet, radish, cucumber, or potato) that allows it to lay flat on the cutting board. You’re always trying to find a flat surface to lay your veggie on when chopping! This makes it more secure.
Cut your long veggies in half. When you’re slicing/chopping a long vegetable like a carrot or celery stick, cut it in half (or thirds) lengthwise first to make it easier to work with.
Keep the root end of your onion intact. This is one of those things that’s easier to see than read, but keeping the root end of your onion in tact helps keep all the layers of the onion together!
Specific demos for easy reference!
Thinly sliced carrot + the claw + a rock chop vs. a push chop:
Diced carrot:
Diced bell pepper:
Cucumber batons:
Thinly sliced onion:
Minced onion:
Sliced kale:
Minced fresh herbs:
How to store fresh herbs:
Thinly sliced potatoes + potato batons:
How to peel, grate, thinly slice, and mince ginger:
How to easily peel and mince garlic:
Thinly sliced garlic

Did you learn something new from watching this tutorial — or is there a vegetable you feel more confident chopping now?! Comment on this post by 11:59 p.m. on Sunday, 4/6, and you’ll be entered to win1 a Victorinox chef’s or santoku knife! We’ll randomly select a winner Monday, 4/7.
PS, my shirt from today’s class is linked here. Obsessed with the sleeves on this one — it’s super thin and breathable for spring/summer.
Have any questions?! Leave them here and we’ll get back to you as soon as possible!
You must be a paid subscriber to What to Cook, 18 years old or older, and a resident of the U.S. to be eligible.


